- Handbook
- Company
- Company
- Board & Investors
- Communications
- Decision making and project management
- Guides
- Organizational Structure
- principles
- Remote Work
- Security
- Access Control Policy
- AI Development and Customer Data Policy
- Asset Management Policy
- Business Continuity & Disaster Recovery Policy
- Cryptography Policy
- Data Management Policy
- Hardware Security Policy
- Human Resources Security Policy
- Incident Response Plan
- Information Security Policy and Acceptable Use Policy
- Information Security Roles and Responsibilities
- Operations Security Policy
- Risk Management Policy
- Secure Development Policy
- Third-Party Risk Management Policy
- strategy
- values
- Operations
- Engineering & Design Practices
- Design
- Engineering
- Marketing department
- Marketing
- Internal Operations
- People Ops
- Sales department
- Sales
- Commercial Organization
- Customer Success
- Edge Connectivity Sales Process
- Engagements & Pricing
- Forecast Review
- HubSpot
- Legal
- operating-principles
- Partnerships
- Processes
- Professional Services
- Sales Compensation Plan
- Sales Deck
- Sales Meetings
- Sales Regions
- Self Hosted Dashboard v2 Multi User
- Subscription Agreement 1.5
Feature Flags in PostHog
We use PostHog to manage feature flags, which let us roll features out to teams without shipping a new release. This page covers how to create a new flag, how to enable an existing one, and how to use flags in code. The create and enable flows both control who a flag applies to using release conditions.
Creating a feature flag
Create the flag once, then make sure it exists in every project before you enable it.
1️⃣ Start a new flag
Open the Feature Flags page and click + New.
2️⃣ Add a unique key
Give the flag a unique key in ALL_CAPS to match our naming conventions — for example, EXPERT_COMMS_BETA_ENABLED. This key is what the application checks against, so make sure it doesn't clash with an existing flag.
3️⃣ Add a description
Add a description explaining what the flag is for and what it gates. This makes it easy for anyone browsing the flag list to tell at a glance what the flag does.
4️⃣ Set the release conditions
Choose who the flag applies to by adding a release condition set — see Release conditions.
5️⃣ Create the flag
Click Save to create the flag.
6️⃣ Copy the flag to all projects
A flag is created in a single project, so you need to copy it across the rest. Open the Projects tab on the flag and copy it to every other project so it's available everywhere.
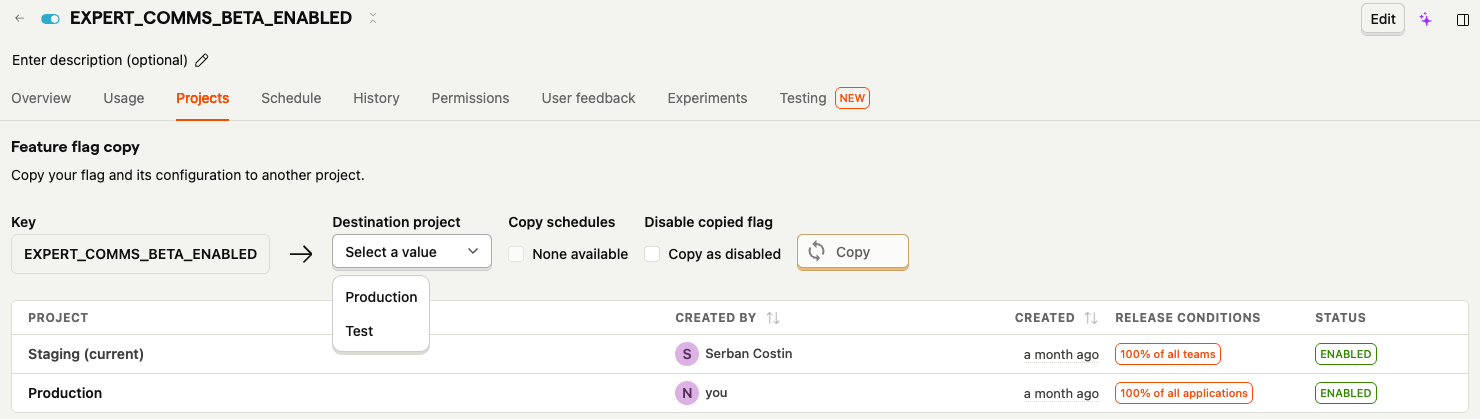
Note: If your release conditions target a specific team, the
teamIddiffers per project. After copying the flag, open it in each project and update theteamIdso you target the right team everywhere.
Release conditions
A release condition set controls who a flag is enabled for. Both creating and enabling a flag use the same options — configure the set for either all teams or a specific team.
All teams
Use this when you want everyone on the platform to get the feature.
- Set Target by to Teams.
- Set Rollout percentage to 100%.
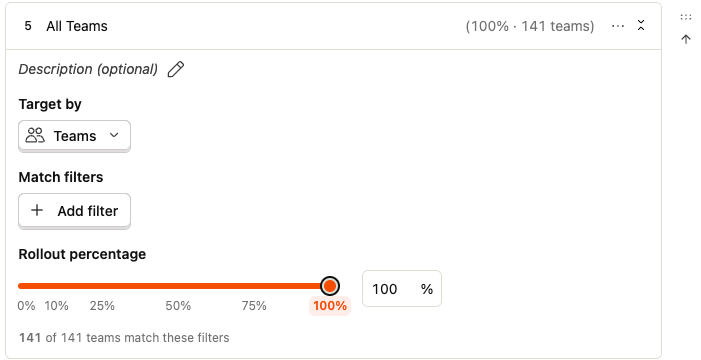
A finished all-teams condition set looks like this:

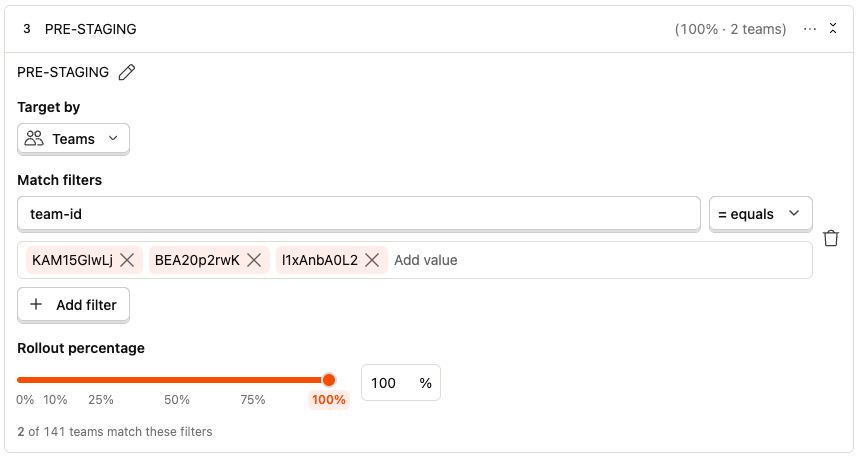
A specific team
Use this when you want to roll the feature out to a single team — for example, to test it with one customer before going wider.
- Set Target by to team-id as the property to match.
- Enter the teamId of the team you want to target as the match value.
- Set Rollout percentage to 100%.
Enabling a feature flag
Once the flag exists in every project, follow these steps to turn it on.
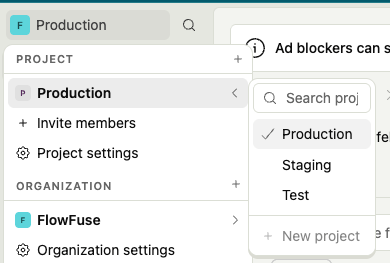
1️⃣ Confirm the environment you're changing
Set your environment in the top-left corner before you touch anything — the same flag can behave differently across environments, so always double-check you're in the right one.
2️⃣ Find the flag you want
Browse the Feature Flags page and pick the flag you intend to enable.
3️⃣ Edit the release conditions
- Click Edit in the top left.
- Scroll down to Release Conditions.
- Click + Add condition set and configure it — see Release conditions.
- Click Save.
4️⃣ Confirm the change
Head back to the Feature Flags page and verify the Release Condition. For an all-teams rollout it reads 100% of all teams; for a specific team it shows the team-id you matched on or Multiple Groups.

Finally, hard refresh in the environment you just enabled to pull the latest flags, and you're good to go!
Using feature flags in code
The flowfuse frontend wires PostHog flags through the account-settings store (frontend/src/stores/account-settings.js).
Where to add the flag — register its key in the POSTHOG_FLAGS constant, then expose a boolean check in the featuresCheck getter:
export const POSTHOG_FLAGS = {
    EXPERT_COMMS_BETA_ENABLED: 'EXPERT_COMMS_BETA_ENABLED'
}

// in featuresCheck:
checks.isExpertCommsBetaEnabled = !!state.posthogFlags[POSTHOG_FLAGS.EXPERT_COMMS_BETA_ENABLED]
How to use it — read the check off the resolved featuresCheck object wherever you need it. In a component template:
<template v-if="featuresCheck?.isExpertCommsBetaEnabled"> … </template>
Or in script/logic — gate a method, computed property, route guard, etc:
if (featuresCheck?.isExpertCommsBetaEnabled) {
    // run the gated behaviour
}